Documentation Search:
Athenaeum Structure
It is helpful to build a mental map of how the parts of Athenaeum fit together.

Modules
The map above has the main menu at the top middle, with the catalogue modules to the lower left corner, borrower modules lower right and issue (circulation) and issue history modules lower middle.
The admin area is off to the right and is normally less used than other areas.
The search box is where non-admin users normally start.
The modules are colour coded and reflect the colour themes you see when using Athenaeum. Colours are used as a visual clue to where you are.
| module | colour | shortcut | notes |
|---|---|---|---|
| Menu | blue | 1 | starting point for most operations |
| Admin | blue | a | configure your administrative preferences here |
| Catalogue | "catalogue" collectively refers to titles, copies and archive (not shown) | ||
| Titles | bronze | t* or c | main entries in the catalogue |
| Copies | copper | p or c* | each holding (e.g. each book) in the catalogue - a title may have one, more or zero copies |
| Borrower | green | b | the library patrons who borrow, reserve and review items and to whom you might levy fees |
| Types | green | t* | the collection of privileges for each type of borrower |
| Circulation (issues) | blue | i | the collection of copies that are currently issued to borrowers |
| History | blue | h | the historical record of issues, including current issues |
| [module descriptions (shortcuts with an asterisk can be customised)] |
Knowing the modules and how they fit is important because - amongst other things - reports are normally generated in the modules that contain their content.
For example, - overdue reports and letters are generated in circulation - historical issue analyses are generated in the history module - annual summaries are generated in the catalogue module.
Navigating
You can navigate around the Athenaeum modules using the buttons on the main menu, or you can quickly navigate using keyboard shortcuts. In many instances you can also navigate from one module to "related" data in other modules (e.g. while viewing a borrower, you can see their historical issues in history with a click of a button).
Take some time to learn the shortcuts for the main functions and modules and then when you are comfortable with those, learn a few more.
Main Commands
Use the following keyboard shortcuts from virtually anywhere to:
| Function | Windows Shortcut | Mac Shortcut |
|---|---|---|
| Main Menu | CTRL 1 | command 1 |
| Search | CTRL 2 | command 2 |
| Issue | CTRL 3 | command 3 |
| Return | CTRL 4 | command 4 |
| Extend | CTRL 5 | command 5 |
| Check | CTRL 6 | command 6 |
Single Key Navigation
When you are not editing text in an Athenaeum field (that is, you are not typing something), you can press the following keys to perform these functions.
| Key | Function |
|---|---|
| 1 | Menu (go here if you are lost) |
| 2 | Search |
| 3 | Issue |
| 4 | Return |
| 5 | Extend |
| 6 | Check |
| a | Admin screen |
| b | Borrower list |
| c | Catalogue: either Title or Copies list depending upon the setting in admin |
| d | When viewing the title or borrower lists, will take you to the detail view of the current record |
| f | Fees list |
| h | Issue History |
| i | Circulation list |
| m | MARC |
| n | Show navigation menu |
| p | catalogue coPies list |
| q | QuickMARC |
| r | Catalogue archive list |
| t | Title list or Borrower types depending upon the setting in admin |
| u | Navigates to utility screens in some modules and the audit layouts when you are in the admin module |
| w | Resets the Athenaeum windows according to your preferences and tries to position them in line with the main window (this only works on the main menu and admin) |
Common Functions
At the top of most screens, the toolbars contain common buttons that execute or reveal relevant commands and functions for the current module. The toolbars are displayed in the modules current colour and may show fewer or more options.
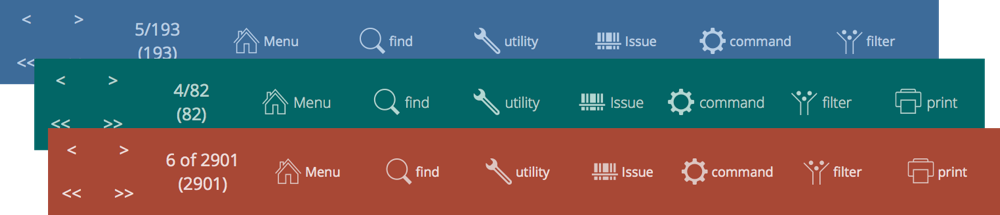
From left to right, the common functions are
- single and double arrows left and right
- jump to previous, first, next, last record in the found set
- counters showing x of y (zzz)
- current record number of the found set of y records (total records in database in parenthesis)
- if an additional number appears above the parenthesis, then this is the total number of records for the selected library
- menu
- click to return to the main menu
- find
- either switch immediately to find mode or perform the find, or show a menu of find options
- utility
- show a pop-over of lesser options or options for performing special commands on the found set of records of the current module
- issue
- an issue menu with issue/return/extend/check borrower functions
- command
- perform commands that operate on the found set of records of the current module (such as listing records related somehow to the current found set, but in a different module)
- filter
- applies find functions or filters on the current module - some filters modify an existing found set and some filters override the current found set. That is, some filters discard previous found sets before performing their function.
- shows a menu of print functions and reports relevant to the found set of the current module
Found Set
A fundamental concept in Athenaeum to reporting or manipulating large amounts of data is that of the found set.
The found set is merely the set of results from a find action; show related action or show all action. However, that result is then used to generate a report, print data, export to a spreadsheet, replace in bulk, bulk dispose or stock take, etc.
By finding different sets of data, you can use the same report function to produce different reports.
Most screens display details of the found set. There will be three or four numbers depending upon whether your Athenaeum is configured to use Libraries and whether you have selected a library.
For example, in the screen shot below, the library filter was set to the "McRobert Branch" and a search was performed for "people":
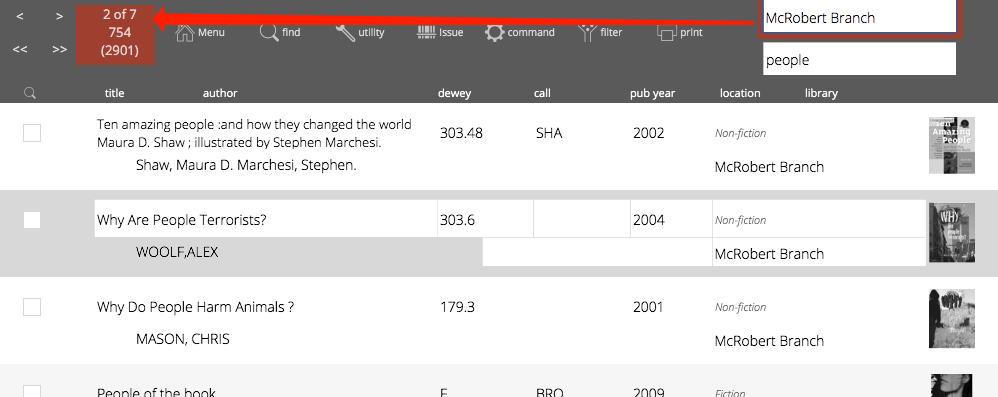
Those four numbers indicate, in turn:
- the "current" record is the 2nd record in the found set
- there were 7 records as a result of the search (so the the found set is 7)
- there are a total of 754 titles in the McRobert Branch library
- 2901 in parentheses is the total number of titles, regardless of how many are shown or hidden
Any time you perform a find or apply a filter, for example, those numbers will likely change.
-
the separate bar code file and other utilities can be deployed when necessary ↩↩↩↩↩↩↩↩↩↩↩↩↩↩↩↩↩↩↩↩↩↩↩↩↩↩↩↩↩↩↩↩↩↩↩↩↩↩↩↩↩↩↩↩↩↩↩↩↩↩↩↩↩↩↩↩↩↩↩↩↩↩↩↩↩↩
-
you can configure this key to show the list of titles or the list of copies in admin ↩↩↩↩
-
you can configure this key to show borrower types instead in admin, if you wish ↩↩↩↩
-
the formulae are stored in Admin->Customisation->Calculations ↩↩↩↩↩
-
The borrower privilege does not define the item as “fiction”, “non-fiction”, etc. Rather it makes the statement: “when issuing this item, Athenaeum will count it as the specified type and compare it to the number of that type that the borrower is allowed” ↩
-
This is a plain number and the numbering system is arbitrary for your installation. So if you have a Year 11 borrower type, for example, you might set the level to just 11. Then if you have items that are only to be borrowed by levels 11 or higher, then that title will have 11 entered against it. ↩↩↩↩↩↩↩↩↩↩↩
-
the found set is used repeatedly in Athenaeum - we highly recommend you learn this concept, as it controls many aspects of reporting ↩↩↩↩↩↩↩↩